Before You Begin
To get started with setting up AWS Bedrock as your organization’s LLM provider, you’ll need a few items in place. Administrator access to the Cline Admin consoleYou need admin privileges to enforce provider settings across your organization. If you can navigate to Settings → Cline Settings in the admin console at app.cline.bot, you have the right access level.
Quick Check: Try accessing the settings page now. If you can see the provider configuration options, you’re good to go.
Your AWS account needs specific Bedrock permissions to work with Cline.
If you don’t have direct AWS access, coordinate with your cloud team to get these permissions set up before proceeding.
Choose your primary AWS region carefully since this will be enforced for all users.

Configuration Steps
1
Access Cline Settings
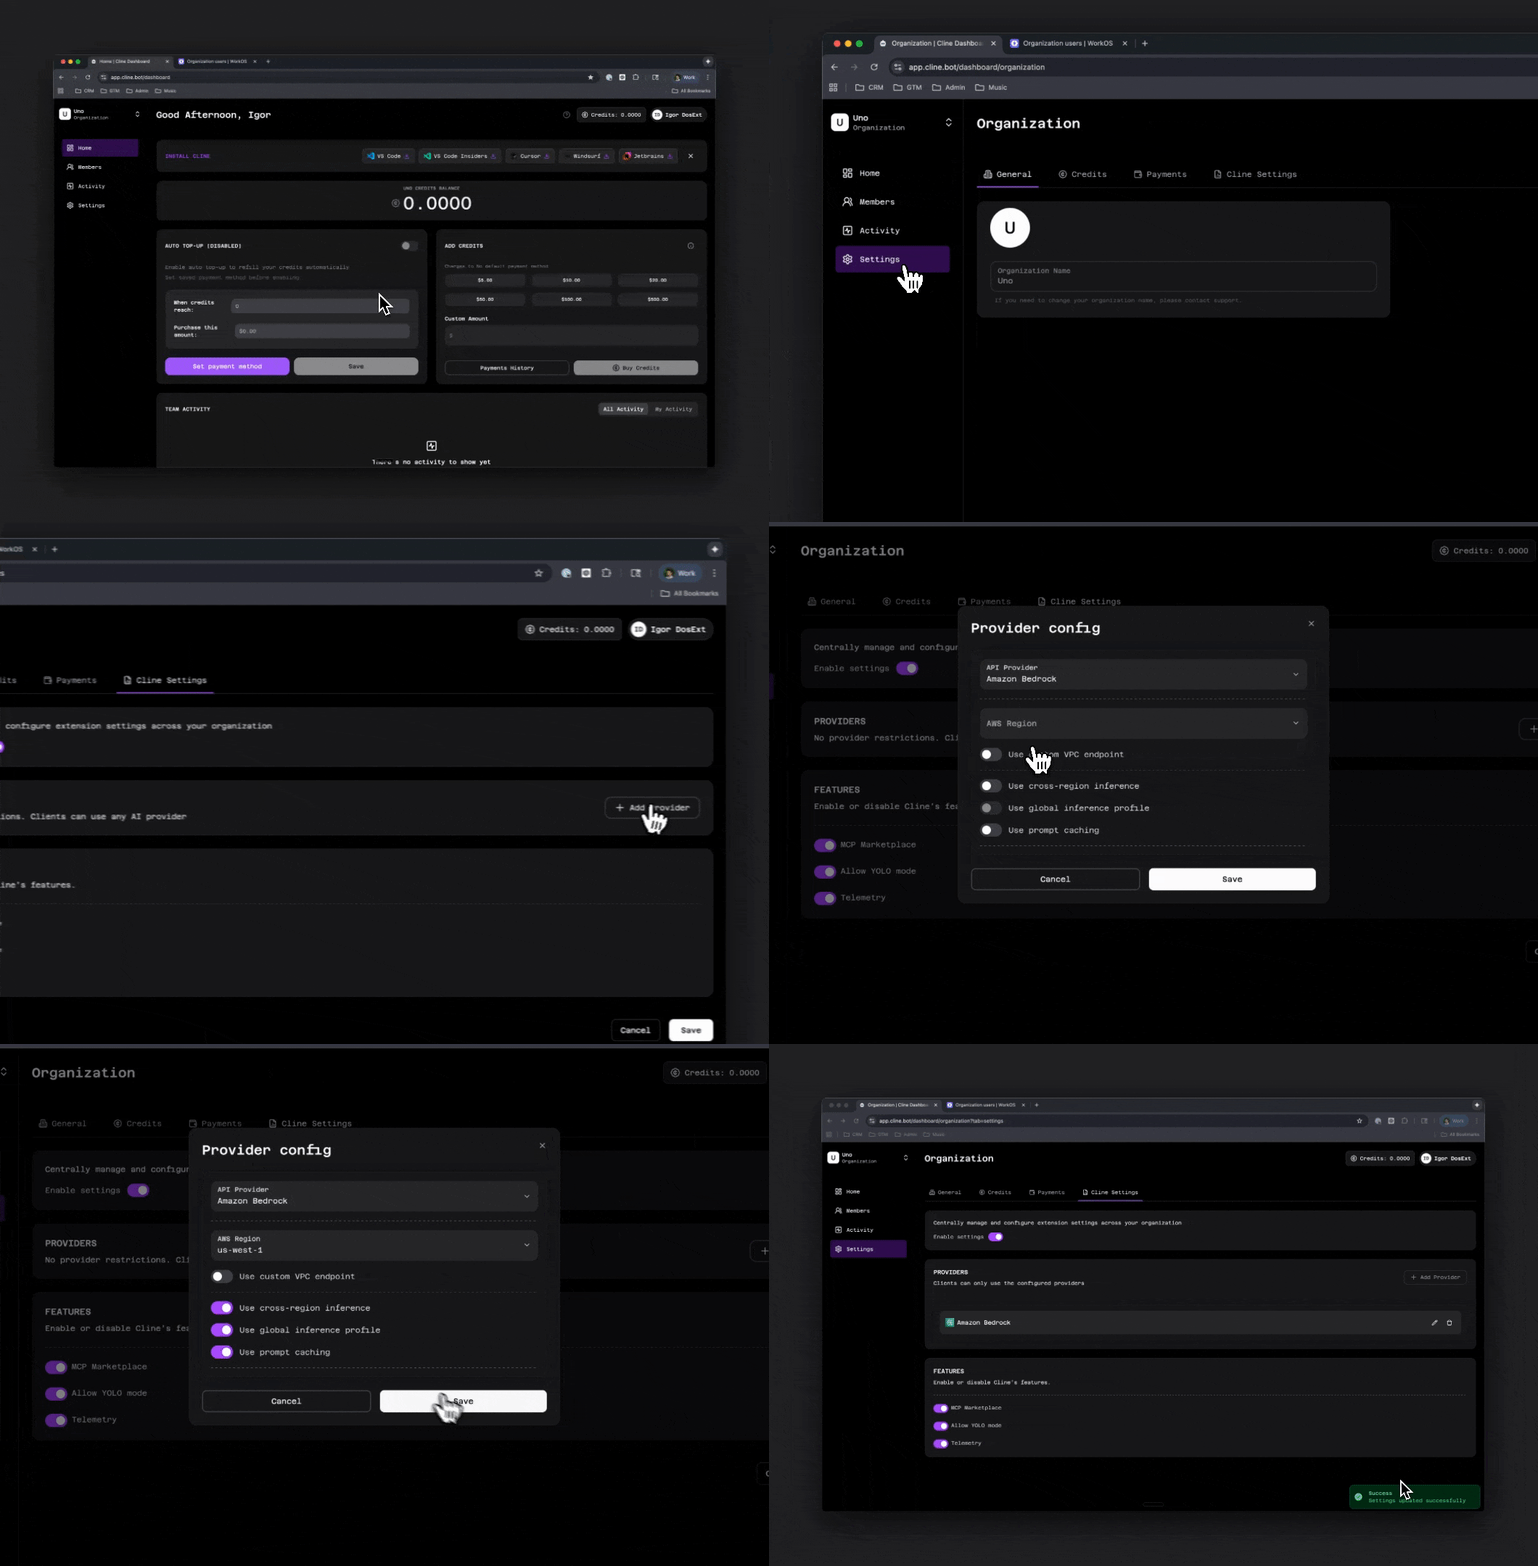
Navigate to app.cline.bot and sign in with your administrator account. Go to Settings → Cline Settings.
You should see the provider configuration options if you have the correct admin access level.
2
Enable Remote Provider Configuration
Toggle on Enable settings to reveal the remote provider configuration options. This allows you to enforce provider settings across your organization.
3
Select AWS Bedrock as the API Provider
Open the API Provider dropdown menu and select Amazon Bedrock. This will open the Bedrock configuration panel where you’ll configure all your organization-wide settings.
4
Configure Bedrock Settings
The configuration panel includes several settings that control how Bedrock works for your organization. Configure what you need:
Region (required)
Region (required)
Enter your preferred AWS region like
us-west-2 or us-east-1. This region will be enforced for all organization members.View AWS Global InfrastructureCustom VPC Endpoint (optional)
Custom VPC Endpoint (optional)
If your organization uses a private VPC endpoint for Bedrock, specify it here to ensure all API calls go through your network infrastructure.Learn more about AWS PrivateLink
Cross-region Inference (optional)
Cross-region Inference (optional)
Enable this to let Bedrock automatically route requests to other regions when your primary region has capacity constraints. Useful for maintaining availability during high-demand periods.Learn more about Inference Profiles
Global Inference Profile (optional)
Global Inference Profile (optional)
Turn this on to use AWS’s global inference routing, which automatically directs requests to the optimal region based on availability and latency.
Prompt Caching (optional)
Prompt Caching (optional)
Enable prompt caching to reduce costs and latency. Bedrock caches portions of prompts that remain consistent across requests, making repeated interactions faster and cheaper.Learn more about Prompt Caching
5
Save Configuration
After configuring your settings, close the provider configuration panel and click Save on the settings page to persist your changes.Once saved, all organization members signed into the Cline extension will automatically use AWS Bedrock with your configured settings. They won’t be able to select other providers or switch to their personal Cline accounts.
Verification
To verify the configuration:- Check that the provider shows as “Amazon Bedrock” in the Enabled provider field
- Confirm the settings persist after refreshing the page
- Test with a member account to ensure they see only Bedrock as a provider
Troubleshooting
Members don’t see the configured providerEnsure you clicked Save after closing the configuration panel. Verify the member account belongs to the correct organization. Configuration changes don’t persist
Make sure to click the Save button on the main settings page, not just close the configuration panel. Need to change regions later
You can update the region at any time. Members will need to ensure their local AWS credentials have access to the new region. For more information, refer to the AWS Bedrock Documentation. For further details, consult the AWS Bedrock Documentation and coordinate with your internal cloud team.

